Wedding Cakes and Makes by Penny Belle

After having my head turned by some of Penny Belle’s amazing cakes and creations, I caught up with designer Nicola Spencer to learn a little bit more about her business and what she can offer couples who are planning their special day. I love the way Nicola has picked her business name. Wanting a name with personal meaning Penny Belle is a blend of her two daughters names, ‘Penny’ from Penelope and ‘Belle’ from Lolabelle.

Image by Clare Oldham Photography
Nicola was kind enough to give me the story behind Penny Belle and described the passion and excitement that she had as a child for making and baking with her mother. It was this first taste of creativity that led her to study for a degree in fashion design, specialising in womenswear tailoring at London College of Fashion. Upon graduating Nicola went to work for a drinks company and became involved in a career which was very different from her studies. However she continued with her hobbies and true passion for sewing and baking in her spare time.

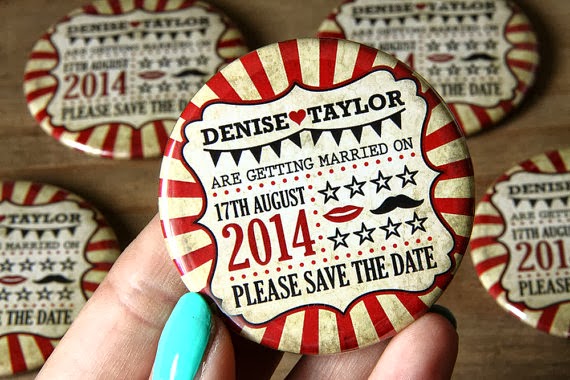
Some of Nicola’s handy work. Image courtesy of Penny Belle
After having her first daughter Nicola found that it was very hard to find unique items on the high street to theme her little girls birthday parties. This gave her the inspiration to create her own pieces and she set about making themed party accessories and cakes. Family and friends loved her designs and told her that she should try selling her products. In 2011 an opportunity arose for her to do just that and she felt that it was the right time for a career change. She wanted to be able to do something that would enable her to spend more time with her two daughters, and so Penny Belle was launched.

Here is a little quote from Nicola that reflects the motivation behind Penny Belle.

“I love different colours and prints and I get inspiration from all things around me. I love what can be made with fabric and with cake. From the start of cutting the fabric or mixing the ingredients, to seeing the finished product and the reactions I get from my children and my customers of what I have created. I love what I do and I know this is what I was meant to do. It is lovely now to have the creative career I have always dreamt of and time for my family, it’s very important to me to have that balance.”

Stall at Bridal Chic in the City Bridal Fayre. Images by Clare Oldham Photography
If you love Penny Belle’s wedding cakes as much as I do then Nicola can sketch and design the perfect cake with you so that the theme and colour scheme is just right for your big day. Cakes are available in all varieties including tiered cakes, character cakes, mini cakes, cookiepops, cupcakes, cakepops and cakepop towers.  They can be made in a number of different flavours too. Cakepops and cupcakes also work well as delicious wedding favours. Each cake can be wrapped individually with ribbon and personalisation added.

Image courtesy of Penny Belle

Image courtesy of Penny Belle

Stunning engagement cake. Image courtesy of Penny Belle
Besides her amazing cakes Nicola also makes some fantastic fabric appliqué party bags, fabric appliqué cards, cushions, aprons and bunting which can be made to order and can be personalised too. My favourite item in her online shop is this gorgeous pink mocking bird print cushion. A bargain at just £12.99.

Mocking Bird Print Cushion available at Penny Belle
If you would like Nicola to create a special cake or bespoke piece for you big day then she can be contacted at info@pennybelle.com.

See more of her beautiful creations at www.pennybelle.co.uk and follow her on facebook and twitter to keep up to date with the latest news.

Twitter: @pennybelle28


Penny Belle’s upcoming events:

  • Exhibiting at the Made in Manchester Wedding Fayre an event run by Bridal Chic in the City and takes place on 27th October 2013 at 2022NQ.

  • Victorian Christmas festival in Brighouse on the 30th Nov and 1stDec 2013.


Images by Clare Oldham Photography and courtesy of Nicola at Penny Belle.


Save the Dates with a Difference

Sending out save the dates seems to be the new and fandangled thing for couples getting hitched nowadays. When I mention save the dates to anyone of my parents generation or older they look at me like they have no idea what I’m talking about. These days our family and friends can be spread across the globe meaning that time is needed to organise travel. We also live far more hectic and busy lifestyles, and if you’re lucky your social diary probably fills up pretty fast. It’s a good idea to get your important date in people diaries asap so that no one is disappointed.
 
Save the dates can be sent out as soon as you have your wedding date set. They can be as formal or informal as you like and don’t need to match your invitations. If it was my choice then I would opt for making them as fun and colourful as possible. Remember, this is the first piece of information that anyone is going to receive about your wedding, so why not make them as eye catching and unique as you can. Jessica Harrington has really ‘hit the nail on the save the date head’ with her amazing idea.


Image courtesy of Jessica @WeddingSavetheDates
Jessica’s idea first came about when she was looking for something different for her own wedding and conjured up the idea of using magnets. As paper can get lost very easily she thought that save the date magnets would be a great alternative. People aren’t going to forget your big day easily if the date is staring them in the face every time they go to the fridge. I also think that these are a great keepsake for guests. Paper will get worn and dog-eared over time but family and friends can hang on to your save the date magnet and have a little piece of your happy day forever.
Image courtesy of Jessica @WeddingSavetheDates
 
Image courtesy of Jessica @WeddingSavetheDates
Jessica is based in Basildon in the UK and runs her save the date business part time alongside her full time job. She takes international orders and loves working with brides and grooms all over the world. Jessica relishes using her creative talent to work on new designs to fit with your wedding theme.

You can find examples of her fantastic creations in her Etsy shop Wedding Save the Dates to give you some inspiration for your own designs. Jessica’s save the dates have created quite a storm in the wedding industry and have been featured on a number of blogs including Hitched.co.uk and Emmalinebride.com. Her designs have also featured in County Weddings Magazines and this year she won Best New Wedding Invitation Designer in Essex in the Industry Expert Awards.
Image courtesy of Jessica @WeddingSavetheDates
Besides selling through her Etsy shop you can find Jessica’s designs on www.rubyanddiva.com. For your own personalised designs Jessica can be contacted at handmade.savethedate@gmail.com or through her Etsy shop www.etsy.com/shop/WeddingSavetheDates.

 
You can keep up to date with her latest news and creations on her facebook https://www.facebook.com/handmadesavethedates and twitter pages @WedSavetheDate

Enchanted by Ophelia May

Image by Georgina Shallard Photography

Recently I have been enchanted by Ophelia May’s beautiful handmade bridal accessories and hair adornments. Jenny Keane is the face behind Ophelia May and has a degree in textile crafts where she specialised in embroidery. Following her degree she did a placement with a bridal designer in London and went on to work in the fashion industry as a designer. During her time working in fashion Jenny found that she missed the creativity involved in designing for the bridal market and so she jumped at the opportunity to set up her own wedding business. Jenny takes great care in designing her pieces and attention is given to every little detail. When I caught up with Jenny she expressed how she hopes that brides will get as much pleasure wearing her pieces as she does from creating them.

Images by Georgina Shallard Photography

Below Jenny describes all of the wonderful elements that make up Ophelia May.

“At Ophelia May each piece is individually handcrafted, with delicate embroidery and embellished with scatterings of Swarovski crystals, tiny pearls and seed beads. The collections are designed using beautiful silks and Scottish lace and vintage bits, to produce a unique selection of intricate head pieces and bridal sashes.”

Images by Georgina Shallard Photography

“I have always had a particular interest in bygone eras and find that this often translates into my work sometimes even unintentionally. I am forever collecting vintage fabrics, jewellery, beads and pearls as well as fragments of antique lace. Not only do these inspire me to create beautiful pieces but they can also be incorporated into the designs, ensuring no two pieces will ever be quite the same.”

Images by Georgina Shallard Photography

“Every piece can be fully customised to suit each customer. I also offer a bespoke service, where family heirlooms or treasured jewellery can be incorporated into the design, creating a unique keepsake for future generations.”

Images by Georgina Shallard Photography

“And for an extra special touch, items can be delicately hand embroidered with names, dates or a significant quote. This can be applied to anything from a bridal sash to a cherished handkerchief.”

You can see more of the beautiful Ophelia May creations at the ‘Made in Manchester’ Wedding Fayre. This is run by Bridal Chic in the City and takes place on 27th October 2013 at 2022NQ, an event space and gallery in the Northern Quarter, Manchester.

Jenny will also be showcasing her pieces at the Wedding Fayre at the York Marriott Hotel. This is run by The Wedding Affair and takes place on 19th January 2014.

You can view the new collection in full on her Facebook page www.facebook.com/OpheliaMayBridaland keep up to date with all the latest developments on her blog http://opheliamaybridal.blogspot.co.uk.


DIY Decorative Jars

Aren’t jars brilliant! I’ve just reminded myself of the Fast Show with that quote and now I’m sat here giggling.
I’m hoping that by the end of this blog post you may never want to throw a glass jar away again, or at least just hang on to a few of them to pretty up your home. Glass jars are so versatile and if you’re planning your big day and thinking of going down the DIY route then they can be used in all sorts of ways for dressing your venue. Here’s just few ideas…
  • Paint them different colours and fill them with flowers to match your theme.
  • Decorate them with ribbons and patterned paper and stick a wooden spoon in them with table numbers on.
  • Use jewellery wire to tie around the tops and make handles, fill them with tea lights and hang around the room or from trees if you’re having an outdoorsy wedding.
  • Fill them with small favours and leave a note next to the jars telling guests to help themselves.
  • Put pens and pencils in them next to your guest book as a nice finishing touch.
  • Fill them with confetti for guests to use
  • Use them to collect money for a good cause and put a little note next to them letting your guests know how their money will be helping.
  • Use them for drinking out of as a quirky alternative to glasses and cups

I could go on, the list is endless!

Anyway, I wanted to show you how easy it is to make your old jam or pasta sauce jars (or whatever was once inside) look amazing. I decorated the jars below in literally minutes (it’s that easy!) from old scraps in my craft box. The larger jar was made by layering up different types of ribbon and the little jar was made by wrapping a strip of lace around the top and attaching some pre-cut shapes. On both of the jars I have secured the ribbon with double sided tape. This is surprisingly strong and stays hidden keeping your project looking tidy. The hearts and butterfly are cut out of pages from an old book using a shape cutter and they are also attached with double sided tape. I stuck a little silver gem on the butterfly to add some sparkle.
So there you go! All you need is some old jars, a bit of ribbon and some double sided tape and you’re away! To get your jars looking sparkly clean and label free before you start decorating them just pop them in the dishwasher and then peel any extra bits of label off while the glass is still warm. The labels should come off easily this way. Warm soapy water and a good scrubbing brush will also do the job.

Pretty Little Cupcake Toppers – DIY x

Good afternoon all H&H lovelies. I hope you have some fantastic plans for the weekend ahead! I was involved in something very exciting yesterday which I am saying no more about right now (‘my lips are sealed’) as i’m saving it for a future blog post. Keep your eyes and ears peeled for the goss’! This evening I will be out enjoying a lovely birthday meal for a friend of mine and Sunday is all about roast dinner with the family. Bring on the Yorkshire puddings! Yummy!
Recently H&H has showcased a number of unique and quirky wedding products from up and coming designer/makers including; One-of-a-kind Hoots, Rubydoodles Jewellery, Flutter Designs and Pink Amaryllis. So I’m thinking that it’s time to spread some DIY wedding gorgeousness with an easy peasy tutorial. Pretty little cupcake toppers here we come!
Here’s what you will need:
  • Toothpicks, little lollipop or craft sticks – small enough to pop in a cupcake.
  • Pretty vintage style patterned paper. You can get free downloads for personal use if you search on Google images. Alternatively hop over to your local craft store.
  •  Craft glue and/or double sided tape depending on what you are making. Fiddlier cut outs will require glue.
  • Shape cutters which can be found on the Internet or at your local craft store.
  • A nice brew and lots of lovely friends to help with cutting and sticking, especially if you are making hundreds of them for your big day!
Step1.Toothpicks, small lollipop sticks or craft sticks are required. Lollipop sticks or craft sticks with blunt ends are probably best if there are going to be little people around. You can never be too careful with those sharp and pointy edges! I’ve used toothpicks for the purpose of this tutorial because they were already in the cupboard.

Step 2. Select some fabulous papers to fit with you colour scheme. You can get lots of free vintage and floral printables for personal use by searching on Google images. Alternatively nip over to your local craft store and have a good browse around.


Step 3. Get yourself a gorgeous little paper cutter in any shape that you desire and go crazy punching the patterns out! This butterlfy cutter was bought from Hobbycraft but you can find various shapes and sizes if you have a look online. There are lots of second hand ones for a very reasonable price on ebay.


Step 4. Now that you’ve got billions of little butterflies, or whatever it is that you are cutting out, select just two of them and grab a little wooden stick.


Step 5.Bob a little bit of craft glue over the back of your cut out. If you are working with dainty shapes it might be worth buying a glue with a little nozzle on like this one to make application easier. You could also use a very fine brush or cotton buds for spreading the glue. Just make sure your project doesn’t end up full of fluff from the cotton buds though.


Step 6. Attach your little wooden stick to the back of the shape that you have just glued making sure that it is carefully placed in the centre. Allow it bond to the glue for few seconds.


Step 7. Pop your other little shape over the top so that the wooden stick is sandwiched in the middle of the two cut outs. Take care to make sure that both of your shapes are lined up properly so that the edges look tidy. It might not feel very secure at this point but this is just because the glue has not set yet. Press it together for a few seconds and then leave it for about an hour or so or until the glue has set properly. Get making many more! 


Ta daaaa! Cute little cupcake toppers! I’m just short of a few cupcakes to put them in now.
It’s worth noting that when gluing shapes together it is probably best to use a slightly thicker paper to avoid them being too flimsy and to stop them from going crinkly. Some shapes are easy to stick on with just a bit of double sided tape and normal paper will be fine if you are doing this. I used double sided tape for the little green and pink heart toppers below.
If you decide to give these a go then please do write in and let me know. I would love to see your own variations!
Michelle x